
172 lines
8.8 KiB
Markdown
172 lines
8.8 KiB
Markdown
<!-- markdownlint-disable MD030 -->
|
||
|
||
# [](https://www.langflow.org)
|
||
|
||
<p align="center"><strong>
|
||
A visual framework for building multi-agent and RAG applications
|
||
</strong></p>
|
||
<p align="center" style="font-size: 12px;">
|
||
Open-source, Python-powered, fully customizable, LLM and vector store agnostic
|
||
</p>
|
||
|
||
<p align="center" style="font-size: 12px;">
|
||
<a href="https://docs.langflow.org" style="text-decoration: underline;">Docs</a> -
|
||
<a href="https://discord.com/invite/EqksyE2EX9" style="text-decoration: underline;">Join our Discord</a> -
|
||
<a href="https://twitter.com/langflow_ai" style="text-decoration: underline;">Follow us on X</a> -
|
||
<a href="https://huggingface.co/spaces/Langflow/Langflow-Preview" style="text-decoration: underline;">Live demo</a>
|
||
</p>
|
||
|
||
<p align="center">
|
||
<a href="https://github.com/langflow-ai/langflow">
|
||
<img src="https://img.shields.io/github/stars/langflow-ai/langflow">
|
||
</a>
|
||
<a href="https://discord.com/invite/EqksyE2EX9">
|
||
<img src="https://img.shields.io/discord/1116803230643527710?label=Discord">
|
||
</a>
|
||
</p>
|
||
|
||
<div align="center">
|
||
<a href="./README.md"><img alt="README in English" src="https://img.shields.io/badge/English-d9d9d9"></a>
|
||
<a href="./README.PT.md"><img alt="README in Portuguese" src="https://img.shields.io/badge/Portuguese-d9d9d9"></a>
|
||
<a href="./README.zh_CN.md"><img alt="README in Simplified Chinese" src="https://img.shields.io/badge/简体中文-d9d9d9"></a>
|
||
</div>
|
||
|
||
<p align="center">
|
||
<img src="./docs/static/img/langflow_basic_howto.gif" alt="Your GIF" style="border: 3px solid #211C43;">
|
||
</p>
|
||
|
||
# 📝 Content
|
||
|
||
- [📝 Content](#-content)
|
||
- [📦 Get Started](#-get-started)
|
||
- [🎨 Create Flows](#-create-flows)
|
||
- [Deploy](#deploy)
|
||
- [Deploy Langflow on Google Cloud Platform](#deploy-langflow-on-google-cloud-platform)
|
||
- [Deploy on Railway](#deploy-on-railway)
|
||
- [Deploy on Render](#deploy-on-render)
|
||
- [🖥️ Command Line Interface (CLI)](#️-command-line-interface-cli)
|
||
- [Usage](#usage)
|
||
- [Environment Variables](#environment-variables)
|
||
- [👋 Contribute](#-contribute)
|
||
- [🌟 Contributors](#-contributors)
|
||
- [📄 License](#-license)
|
||
|
||
# 📦 Get Started
|
||
|
||
You can install Langflow with pip:
|
||
|
||
```shell
|
||
# Make sure you have >=Python 3.10 installed on your system.
|
||
# Install the pre-release version (recommended for the latest updates)
|
||
python -m pip install langflow --pre --force-reinstall
|
||
|
||
# or stable version
|
||
python -m pip install langflow -U
|
||
```
|
||
|
||
Then, run Langflow with:
|
||
|
||
```shell
|
||
python -m langflow run
|
||
```
|
||
|
||
You can also preview Langflow in [HuggingFace Spaces](https://huggingface.co/spaces/Langflow/Langflow-Preview). [Clone the space using this link](https://huggingface.co/spaces/Langflow/Langflow-Preview?duplicate=true) to create your own Langflow workspace in minutes.
|
||
|
||
# 🎨 Create Flows
|
||
|
||
Creating flows with Langflow is easy. Simply drag components from the sidebar onto the canvas and connect them to start building your application.
|
||
|
||
Explore by editing prompt parameters, grouping components into a single high-level component, and building your own Custom Components.
|
||
|
||
Once you’re done, you can export your flow as a JSON file.
|
||
|
||
Load the flow with:
|
||
|
||
```python
|
||
from langflow.load import run_flow_from_json
|
||
|
||
results = run_flow_from_json("path/to/flow.json", input_value="Hello, World!")
|
||
```
|
||
|
||
# Deploy
|
||
|
||
## Deploy Langflow on Google Cloud Platform
|
||
|
||
Follow our step-by-step guide to deploy Langflow on Google Cloud Platform (GCP) using Google Cloud Shell. The guide is available in the [**Langflow in Google Cloud Platform**](https://github.com/langflow-ai/langflow/blob/dev/docs/docs/deployment/gcp-deployment.md) document.
|
||
|
||
Alternatively, click the **"Open in Cloud Shell"** button below to launch Google Cloud Shell, clone the Langflow repository, and start an **interactive tutorial** that will guide you through the process of setting up the necessary resources and deploying Langflow on your GCP project.
|
||
|
||
[](https://console.cloud.google.com/cloudshell/open?git_repo=https://github.com/langflow-ai/langflow&working_dir=scripts/gcp&shellonly=true&tutorial=walkthroughtutorial_spot.md)
|
||
|
||
## Deploy on Railway
|
||
|
||
Use this template to deploy Langflow 1.0 Preview on Railway:
|
||
|
||
[](https://railway.app/template/UsJ1uB?referralCode=MnPSdg)
|
||
|
||
Or this one to deploy Langflow 0.6.x:
|
||
|
||
[](https://railway.app/template/JMXEWp?referralCode=MnPSdg)
|
||
|
||
## Deploy on Render
|
||
|
||
<a href="https://render.com/deploy?repo=https://github.com/langflow-ai/langflow/tree/dev">
|
||
<img src="https://render.com/images/deploy-to-render-button.svg" alt="Deploy to Render" />
|
||
</a>
|
||
|
||
# 🖥️ Command Line Interface (CLI)
|
||
|
||
Langflow provides a command-line interface (CLI) for easy management and configuration.
|
||
|
||
## Usage
|
||
|
||
You can run the Langflow using the following command:
|
||
|
||
```shell
|
||
langflow run [OPTIONS]
|
||
```
|
||
|
||
Each option is detailed below:
|
||
|
||
- `--help`: Displays all available options.
|
||
- `--host`: Defines the host to bind the server to. Can be set using the `LANGFLOW_HOST` environment variable. The default is `127.0.0.1`.
|
||
- `--workers`: Sets the number of worker processes. Can be set using the `LANGFLOW_WORKERS` environment variable. The default is `1`.
|
||
- `--timeout`: Sets the worker timeout in seconds. The default is `60`.
|
||
- `--port`: Sets the port to listen on. Can be set using the `LANGFLOW_PORT` environment variable. The default is `7860`.
|
||
- `--env-file`: Specifies the path to the .env file containing environment variables. The default is `.env`.
|
||
- `--log-level`: Defines the logging level. Can be set using the `LANGFLOW_LOG_LEVEL` environment variable. The default is `critical`.
|
||
- `--components-path`: Specifies the path to the directory containing custom components. Can be set using the `LANGFLOW_COMPONENTS_PATH` environment variable. The default is `langflow/components`.
|
||
- `--log-file`: Specifies the path to the log file. Can be set using the `LANGFLOW_LOG_FILE` environment variable. The default is `logs/langflow.log`.
|
||
- `--cache`: Selects the type of cache to use. Options are `InMemoryCache` and `SQLiteCache`. Can be set using the `LANGFLOW_LANGCHAIN_CACHE` environment variable. The default is `SQLiteCache`.
|
||
- `--dev/--no-dev`: Toggles the development mode. The default is `no-dev`.
|
||
- `--path`: Specifies the path to the frontend directory containing build files. This option is for development purposes only. Can be set using the `LANGFLOW_FRONTEND_PATH` environment variable.
|
||
- `--open-browser/--no-open-browser`: Toggles the option to open the browser after starting the server. Can be set using the `LANGFLOW_OPEN_BROWSER` environment variable. The default is `open-browser`.
|
||
- `--remove-api-keys/--no-remove-api-keys`: Toggles the option to remove API keys from the projects saved in the database. Can be set using the `LANGFLOW_REMOVE_API_KEYS` environment variable. The default is `no-remove-api-keys`.
|
||
- `--install-completion [bash|zsh|fish|powershell|pwsh]`: Installs completion for the specified shell.
|
||
- `--show-completion [bash|zsh|fish|powershell|pwsh]`: Shows completion for the specified shell, allowing you to copy it or customize the installation.
|
||
- `--backend-only`: This parameter, with a default value of `False`, allows running only the backend server without the frontend. It can also be set using the `LANGFLOW_BACKEND_ONLY` environment variable.
|
||
- `--store`: This parameter, with a default value of `True`, enables the store features, use `--no-store` to deactivate it. It can be configured using the `LANGFLOW_STORE` environment variable.
|
||
|
||
These parameters are important for users who need to customize the behavior of Langflow, especially in development or specialized deployment scenarios.
|
||
|
||
### Environment Variables
|
||
|
||
You can configure many of the CLI options using environment variables. These can be exported in your operating system or added to a `.env` file and loaded using the `--env-file` option.
|
||
|
||
A sample `.env` file named `.env.example` is included with the project. Copy this file to a new file named `.env` and replace the example values with your actual settings. If you're setting values in both your OS and the `.env` file, the `.env` settings will take precedence.
|
||
|
||
# 👋 Contribute
|
||
|
||
We welcome contributions from developers of all levels to our open-source project on GitHub. If you'd like to contribute, please check our [contributing guidelines](./CONTRIBUTING.md) and help make Langflow more accessible.
|
||
|
||
---
|
||
|
||
[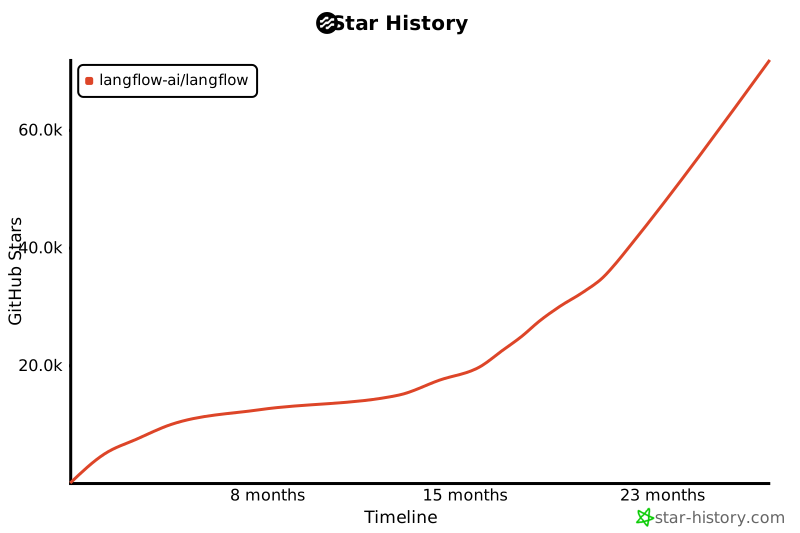](https://star-history.com/#langflow-ai/langflow&Date)
|
||
|
||
# 🌟 Contributors
|
||
|
||
[](https://github.com/langflow-ai/langflow/graphs/contributors)
|
||
|
||
# 📄 License
|
||
|
||
Langflow is released under the MIT License. See the [LICENSE](LICENSE) file for details.
|